| 2012(16GBモデル) | 2013(16GB/WiFiモデル) | ||
|---|---|---|---|
| androidバージョン | 4.3 | 4.3 | |
| モデル番号 | Nexus 7 | Nexus 7 | |
| カーネルバージョン | 3.1.10-g1e8b3d8 | 3.4.0-g6537a16 | |
| ビルド番号 | JWR66Y | JSS15Q | |
| ディスプレイ | インチ | 7.3 | 6.8 |
| Density | tvdpi(213dpi) | xhdpi(320dpi) | |
| 解像度(px) | 800x1280 | 1200x1920 | |
| 解像度(dp) | 601.5x962.4 | 600x960 | |
| Size | large | large | |
| Aspect ratio | notlong | notlong | |
| おまけ | 重さ | 340g | 290g(ちょい軽い!) |
| 厚さ | 10.45mm | 8.65mm(ちょい薄い!) | |
| バッテリー | 4325mAH | 3950mAH(え!?) | |
| RAM | 1GB | 2GB | |
| CPU | 1.2GHz (NVIDIA Tegra 3) | 1.5 GHz (Qualcomm Snapdragon S4 Pro) | |
| お値段(Google Play) | ¥19,800 | ¥27,800 | |
Nexus 7 2012とNexus 7 2013を比較
twitpic "Could not authenticate you (header rejected by twitter)."
twitpic
なんか知らないんだけどtwitpicっていうのを使っているサービスがあって、今更、例のtwitter API 1.1対応みたいなお仕事したんですが、twitpicのAPIを叩くと、Could not authenticate you (header rejected by twitter).って言われちゃう。
なのでtwitpicのAPIドキュメントのこれ↓
http://dev.twitpic.com/docs/2/upload/
をみたところ、
X-Verify-Credentials-Authorization (Required)
Header Example
1 OAuth realm="http://api.twitter.com/",
2 oauth_consumer_key="GDdmIQH6jhtmLUypg82g",
3 oauth_signature_method="HMAC-SHA1",
4 oauth_token="819797-Jxq8aYUDRmykzVKrgoLhXSq67TEa5ruc4GJC2rWimw",
5 oauth_timestamp="1272325550",
6 oauth_nonce="oElnnMTQIZvqvlfXM56aBLAf5noGD0AQR3Fmi7Q6Y",
7 oauth_version="1.0",
8 oauth_signature="U1obTfE7Rs9J1kafTGwufLJdspo%3D"

X-Auth-Service-Provider (Required)
https://api.twitter.com/1/account/verify_credentials.json
って書いてあるんだけど、X-Auth-Service-Providerを
https://api.twitter.com/1.1/account/verify_credentials.jsonにするのはもちろん、oauth_signatureを作っているURLも
https://api.twitter.com/1.1/statuses/update.jsonとかにする必要があったです。はい。

Apache HBase "Could not reserve enough space for heap offset array"
- Run "./bin/hbase shell",
$ ./bin/hbase shell
Error: Could not create the Java Virtual Machine.
Error: A fatal exception has occurred. Program will exit.
Error occurred during initialization of VM
Could not reserve enough space for heap offset array
- "Could not reserve enough space for heap"?
- Edit "./conf/hbase-env.sh",
$ vi conf/hbase-env.sh
export _JAVA_OPTIONS='-Xmx256m -Xms64m'

# Extra Java CLASSPATH elements.  Optional.
# export HBASE_CLASSPATH=

# The maximum amount of heap to use, in MB. Default is 1000.
export HBASE_HEAPSIZE=128
~/.pam_environment
- Open "~/.pam_environment",
LANGUAGE=ja_JP:zh_CN:en
LANG=ja_JP.UTF-8
LC_NUMERIC=ja_JP.UTF-8
LC_TIME=ja_JP.UTF-8
LC_MONETARY=ja_JP.UTF-8
LC_PAPER=ja_JP.UTF-8
LC_NAME=ja_JP.UTF-8
LC_ADDRESS=ja_JP.UTF-8
LC_TELEPHONE=ja_JP.UTF-8
LC_MEASUREMENT=ja_JP.UTF-8
LC_IDENTIFICATION=ja_JP.UTF-8
- wtf? "zh_CN"?
- I edited "LANGUAGE" line to,
LANGUAGE=ja_JP:en
Screen freezed at "Checking battery state..." at startup of ubuntu 12.10.
- Open "/etc/default/grub" file.
$ sudo vi /etc/default/grub
Edit "GRUB_CMDLINE_LINUX_DEFAULT" like this,
GRUB_CMDLINE_LINUX_DEFAULT="quiet splash console=tty1"
- Update grub settings.
$ sudo update-grub
- Reboot system.
see also: http://steadyassimilation.blogspot.jp/2012/04/note-ubuntu-1204lts.html
APK Expansion Files
Development environment.
- Ubuntu 11.10 (Oneiric)
- JDK 1.6.0_24-b07
- Eclipse 3.7.3 (Indigo)
- Android Development Toolkit 17.0.0
Preparing.
- Get a publisher account here for Google Play, if you don't have yet.
- Download two packages from the SDK Manager.('Google Play APK Expansion Library' and 'Google Play Licensing Library')

Android SDK Manager - Create two library projects from existing source.
- <sdk>/extras/google/play_apk_expansion/downloader_library
- <sdk>/extras/google/play_licensing/library
- Create a new project which you want to use APK Expansion Files and add above two library project to your new project's build path.

Add a reference to a library project


Implementing.
- Downloader service.
// Extends com.google.android.vending.expansion.downloader.impl.DownloaderService class and override three methods. public class ExpansionFileDownloaderService extends DownloaderService { // the Base64-encoded RSA public key for your publisher account private static final String PUBLIC_KEY = "{YOU_PUBLIC_KEY}"; // Generate 20 random bytes, and put them here. private static final byte[] SALT = new byte[] {}; @Override public String getPublicKey() { return PUBLIC_KEY; } @Override public byte[] getSALT() { return SALT; } @Override public String getAlarmReceiverClassName() { return ExpansionFileAlarmReceiver.class.getName(); } } - Alarm receiver.
public class ExpansionFileAlarmReceiver extends BroadcastReceiver { @Override public void onReceive(Context context, Intent intent) { try { DownloaderClientMarshaller.startDownloadServiceIfRequired( context, intent, ExpansionFileDownloaderService.class); } catch (NameNotFoundException e) { Log.e("apk-expansion-files", "NameNotFoundException occurred. " + e.getMessage(), e); } } } - Main activity.
@Override
 public void onCreate(Bundle savedInstanceState) {
  super.onCreate(savedInstanceState);
  setContentView(R.layout.main);

  // Check whether the file have been downloaded.
  String mainFileName = Helpers.getExpansionAPKFileName(this, true, 1);
  boolean fileExists = Helpers.doesFileExist(this, mainFileName, 32921796L, false);
  if (!fileExists) {
   Intent launcher = getIntent();
   Intent fromNotification = new Intent(this, getClass());
   fromNotification.setFlags(Intent.FLAG_ACTIVITY_NEW_TASK | Intent.FLAG_ACTIVITY_CLEAR_TOP);
   fromNotification.setAction(launcher.getAction());
   if (launcher.getCategories() != null) {
    for (String cat : launcher.getCategories()) {
     fromNotification.addCategory(cat);
    }
   }
   PendingIntent pendingIntent = PendingIntent.getActivity(
     this, 0, fromNotification, PendingIntent.FLAG_UPDATE_CURRENT);
   try {
    // Start the download
    int result = DownloaderClientMarshaller.startDownloadServiceIfRequired(
      this, pendingIntent, ExpansionFileDownloaderService.class);
    if (DownloaderClientMarshaller.NO_DOWNLOAD_REQUIRED != result) {
     // implement Downloading UI.
     return;
    }
   } catch (NameNotFoundException e) {
    Log.e("apk-expansion-files", "NameNotFoundException occurred. " + e.getMessage(), e);
   }
  }
  // expansion file is available. start your application.
 }
Manifest declarations.
- uses-permission
<!-- Required to access Android Market Licensing -->
<uses-permission android:name="com.android.vending.CHECK_LICENSE" />
<!-- Required to download files from Android Market -->
<uses-permission android:name="android.permission.INTERNET" />
<!-- Required to keep CPU alive while downloading files (NOT to keep screen awake) -->
<uses-permission android:name="android.permission.WAKE_LOCK" />
<!-- Required to poll the state of the network connection and respond to changes -->
<uses-permission android:name="android.permission.ACCESS_NETWORK_STATE" />
<!-- Required to check whether Wi-Fi is enabled -->
<uses-permission android:name="android.permission.ACCESS_WIFI_STATE"/>
<!-- Required to read and write the expansion files on shared storage -->
<uses-permission android:name="android.permission.WRITE_EXTERNAL_STORAGE" />
- application
<application
    android:icon="@drawable/ic_launcher"
    android:label="@string/app_name">
    <activity
        android:name=".MainActivity"
        android:label="@string/app_name" >
        <intent-filter>
            <action android:name="android.intent.action.MAIN" />
            <category android:name="android.intent.category.LAUNCHER" />
        </intent-filter>
    </activity>
    <service android:name=".ExpansionFileDownloaderService" android:label="@string/app_name" />
    <receiver android:name=".ExpansionFileAlarmReceiver" android:label="@string/app_name" />
</application>
Testing APK Expansion Files
- Upload the application APK file and Expansion Files using the Google Play Developer Console.

Uploading APK and Expansion file. - Fill in the necessary application details. Click the Save button. Do not click Publish.
- Install the application on your test device and launch the app. Download will start soon.

android.widget.Toast.LENGTH_SHORT | LENGTH_LONG は何秒か?
実際、android.widget.Toast.LENGTH_SHORTとandroid.widget.Toast.LENGTH_LONGは何秒なのか?
- com.android.server.NotificationManager#scheduleTimeoutLocked()
private void scheduleTimeoutLocked(ToastRecord r, boolean immediate) { Message m = Message.obtain(mHandler, MESSAGE_TIMEOUT, r); long delay = immediate ? 0 : (r.duration == Toast.LENGTH_LONG ? LONG_DELAY : SHORT_DELAY); mHandler.removeCallbacksAndMessages(r); mHandler.sendMessageDelayed(m, delay); } - com.android.server.NotificationManager.LONG_DELAY, SHORT_DELAY
private static final int LONG_DELAY = 3500; // 3.5 seconds
private static final int SHORT_DELAY = 2000; // 2 seconds
- 2秒と3.5秒なのかな?
see also: android.widget.Toast
make: *** [out/host/linux-x86/obj/STATIC_LIBRARIES/libMesa_intermediates/src/glsl/linker.o] エラー1
android 最新ソースの make でコケた
こんなエラーメッセージが出て。。。
make: *** [out/host/linux-x86/obj/STATIC_LIBRARIES/libMesa_intermediates/src/glsl/linker.o] エラー1
環境
- ubuntu 11.10 (64bit)
- あとは全部ここに書いてあるビルド環境
エラーメッセージでググったらすぐ解決した
まあ、備忘録ってことで。(ここを参照のこと)
I'm hitting this too. The bug is the use of the offsetof() macro. Adding a "#include <stddef.h>" to linker.cpp fixes the issue for me.とのことなので、
$ vi external/mesa3d/src/glsl/linker.cpp
#include "main/shaderobj.h"

#include <stddef.h>

/**
 * Visitor that determines whether or not a variable is ever written.
 */
class find_assignment_visitor : public ir_hierarchical_visitor {
したら、一応最後まで走りましたよっと。
Ubuntu で EC2 〜 Apache Cassandra On AWS EC2 の事前準備として〜
- ここを参考に AWS EC2 上で Apache Cassandra 1.0.5 を動かすために、前提として必要だったので以下にメモ。
- ローカル ubuntu から ubuntu 公式 AMI をつかって EC2 でインスタンスを起動するところまで。
- ここを見ればほぼすんなり行くはず。
ローカルの環境
- ubuntu 11.10 (64bit)
- $ java -version
java version "1.6.0_23" - もちろん AWS のアカウントは事前に取っておく
EC2 API Tools をインストール
- X.509 証明書を作っておいてローカルにダウンロードしておく。

いつもどこから行くのか忘れる・・・ 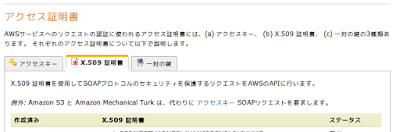
このタブ - ec2-api-tools インストール
$ sudo apt-get install ec2-api-tools
- 環境変数
- 東京リージョンを使うのでその指定と
- さっき落とした X.509 証明書のパス
$ vi ~/.bashrc
export EC2_URL=https://ec2.ap-northeast-1.amazonaws.com # <- これ Asia Pacific (Tokyo)
export EC2_PRIVATE_KEY=/path/to/aws/pk/pk-pekepekepeke.pem # X.509 証明書の
export EC2_CERT=/path/to/aws/cert/cert-pekepekepeke.pem # X.509 証明書の
$ source ~/.bashrc
- 適当に ec2-xxxx を叩いて動くか確認
$ ec2-describe-images -o self -o amazon


Official Ubuntu Cloud Guest AMI でインスタンス起動
- 普段使っている公開鍵をインポートしておく
$ ec2-import-keypair {KEY_NAME} --public-key-file ~/.ssh/id_rsa.pub
$ ec2-run-instances ami-7c90277d -g "default" --instance-type m1.large --region ap-northeast-1 --key {KEY_NAME}
$ ec2-describe-instances
$ ssh ubuntu@{PUBLIC_DNS}
$ ec2-terminate-instances {INSTANCE}
Apache Cassandra On AWS EC2
Apache Cassandra クラスタ環境を AWS EC2 上で
※Step.Nは公式の wiki にだいたい対応。
■ Step.1 EC2 セキュリティ・グループ「Talk To Cassandra Local Zone」の作成
$ ec2-create-group "Talk To Cassandra Local Zone" -d "Group for any machine that talks to Cassandra"
$ ec2-authorize "Talk To Cassandra Local Zone" -P tcp -p 22 -s 0.0.0.0/0
■ Step.2 あとで必要なので「Talk To Cassandra Local Zone」の {OwnerID} をメモっておく
$ ec2-describe-group "Talk To Cassandra Local Zone"※12ケタぐらいの数字のやつ
■ Step.3 EC2 セキュリティ・グループ「Cassandra Nodes」の作成
$ ec2-create-group "Cassandra Nodes" -d "Group for any Cassandra machine"
$ ec2-authorize "Cassandra Nodes" -P tcp -p 22 -s 0.0.0.0/0
■ Step.4 あとで必要なので「Cassandra Nodes」の {OwnerID} をメモっておく
$ ec2-describe-group "Cassandra Nodes"※12ケタぐらいの数字のやつ
■ Step.5 「Cassandra Nodes」間で以下の各ポートに接続可能なように開けておく
$ ec2-authorize "Cassandra Nodes" -P tcp -p 7000 -o "Cassandra Nodes" -u {OwnerID}
$ ec2-authorize "Cassandra Nodes" -P tcp -p 9160 -o "Cassandra Nodes" -u {OwnerID}
$ ec2-authorize "Cassandra Nodes" -P tcp -p 8080 -o "Cassandra Nodes" -u {OwnerID}
※ {OwnerID} は「Talk To Cassandra Local Zone」のほう■ Step.6 「Talk To Cassandra Local Zone」も同様に以下の各ポートを開けておく
$ ec2-authorize "Cassandra Nodes" -P tcp -p 9160 -o "Talk To Cassandra Local Zone" -u {OwnerID}
$ ec2-authorize "Cassandra Nodes" -P tcp -p 8080 -o "Talk To Cassandra Local Zone" -u {OwnerID}
※ {OwnerID} は「Talk To Cassandra Local Zone」のほう■ Step.7 キーペアを作成する
- 作り方はここ
■ Step.8 〜 Step.10 SEED インスタンスを起動する
$ ec2-run-instances ami-7c90277d -g "Cassandra Nodes" --instance-type m1.large --region ap-northeast-1 --key {KEYPAIR_NAME}
※{KEYPAIR_NAME} は Step.7 で作ったもの※「ami-7c90277d」という AMI は ubuntu 公式のもの。
■ Step.11 describe してパブリック DNS (={SEED_PUBLIC_DNS})とプライベート IP (={SEED_PRIVATE_IP})をコピっておく
$ ec2-describe-instances
■ Step.12 SEED になる Cassandra をセットアップ
- インスタンスにログイン
$ ssh ubuntu@{SEED_PUBLIC_DNS}
$ sudo apt-get update
$ sudo apt-get install openjdk-6-jdk
$ java -version
java version "1.6.0_23"
$ vi 1.0.5/conf/cassandra.yaml以下のとおり編集する
- initial_token: 0
- seeds: "{SEED_PRIVATE_IP}"
- listen_address: {SEED_PRIVATE_IP}
- rpc_address: 0.0.0.0
- endpoint_snitch: org.apache.cassandra.locator.RackInferringSnitch
■ Step.13 NON SEED インスタンスを起動する
$ ec2-run-instances ami-7c90277d -g "Cassandra Nodes" --instance-type m1.large --region ap-northeast-1 --key {KEYPAIR_NAME}
describe してパブリック DNS (={NON_SEED_PUBLIC_DNS})とプライベートな IP (={NON_SEED_PRIVATE_IP})をコピっておく$ ec2-describe-instances
■ Step.14 NON SEED の Cassandra をセットアップ
- インスタンスにログイン
$ ssh ubuntu@{NON_SEED_PUBLIC_DNS}
$ sudo apt-get update
$ sudo apt-get install openjdk-6-jdk
$ java -version
java version "1.6.0_23"
$ vi 1.0.5/conf/cassandra.yaml以下のとおり編集する
- initial_token: 12345678901234567890123456789012345678
- seeds: "{SEED_PRIVATE_IP}"
- listen_address: {NON_SEED_PRIVATE_IP}
- rpc_address: 0.0.0.0
- endpoint_snitch: org.apache.cassandra.locator.RackInferringSnitch
■ 確認
- SEED インスタンスにログイン
$ ssh ubuntu@{SEED_PUBLIC_DNS}
$ nodetool -h localhost ring
Address                  DC          Rack        Status State   Load            Owns    Token
                                                                               12345678901234567890123456789012345678
{SEED_PRIVATE_IP}        ***         ***         Up     Normal  13.41 KB        92.74%  0
{NON_SEED_PRIVATE_IP}    ***         ***         Up     Normal  6.68 KB         7.26%   12345678901234567890123456789012345678
[default@unknown] create keyspace awstest1 with placement_strategy = 'org.apache.cassandra.locator.SimpleStrategy'
... and strategy_options = {replication_factor:2};
Apache Cassandra 1.0.5 インストール〜設定〜起動(シングルノード)
■ 環境
- ubuntu 11.10
- java version "1.6.0_23"(1.6の最低でもu19が必要でu21以上がベターらしい)
■ インストール
- CASSANDRA_HOME作成
$ mkdir -p apache/cassandra
$ cd apache/cassandra
以下、このディレクトリで作業します
$ pwd
/home/ktakeda47/apache/cassandra
$ wget http://www.meisei-u.ac.jp/mirror/apache/dist//cassandra/1.0.5/apache-cassandra-1.0.5-bin.tar.gz
$ tar xvzf apache-cassandra-1.0.5-bin.tar.gz
$ mv apache-cassandra-1.0.5/ 1.0.5
■ 設定
- CASSANDRA_HOME/binにパスを通す
$ vi ~/.bashrcこんなかんじ
export CASSANDRA_HOME=/home/ktakeda47/apache/cassandra/1.0.5
export PATH=$PATH:$CASSANDRA_HOME/bin
$ source ~/.bashrc
$ mkdir data
$ mkdir commitlog
$ mkdir saved_caches
$ vi 1.0.5/conf/cassandra.yaml
$ mkdir log
$ vi 1.0.5/conf/log4j-server.properties
■ 起動
- error, fatalが出なければ成功
$ cassandra -f
■ cassandra_cliからアクセス
- 起動までつつがなく行っていれば、あとはcassandra-cliで遊べます
$ cassandra-cli
登録:
投稿 (Atom)